Skip to content Skip to footer

Many homeowners are curious about what goes into a professional Paver Installation Process — and rightfully so.

At Landmark Hardscapes, we believe in complete transparency and take pride in the craftsmanship behind every Paver Installation Process. From the foundation to the final finish, each step of our process is designed for long-term strength, precision, and beauty. Here’s what you can expect when you choose Landmark Hardscapes.

Paver Installation Diagram
step 1

Excavation & Grading

We carefully excavate the project area to the proper depth to accommodate the required base, bedding sand, and paver thickness. Proper grading ensures consistent elevations and correct water drainage away from structures.

Paver installation process. Excavating and grading to ensure proper depth, slope, and drainage.
Geofabric Installation in San Diego
step 2

Geofabric Installation

A commercial-grade geofabric is installed over the native soil to separate the base from the subgrade. This crucial step prevents base migration, increases load stability, and greatly reduces the risk of future settling or shifting.

step 3

Base Material — Class II Road Base

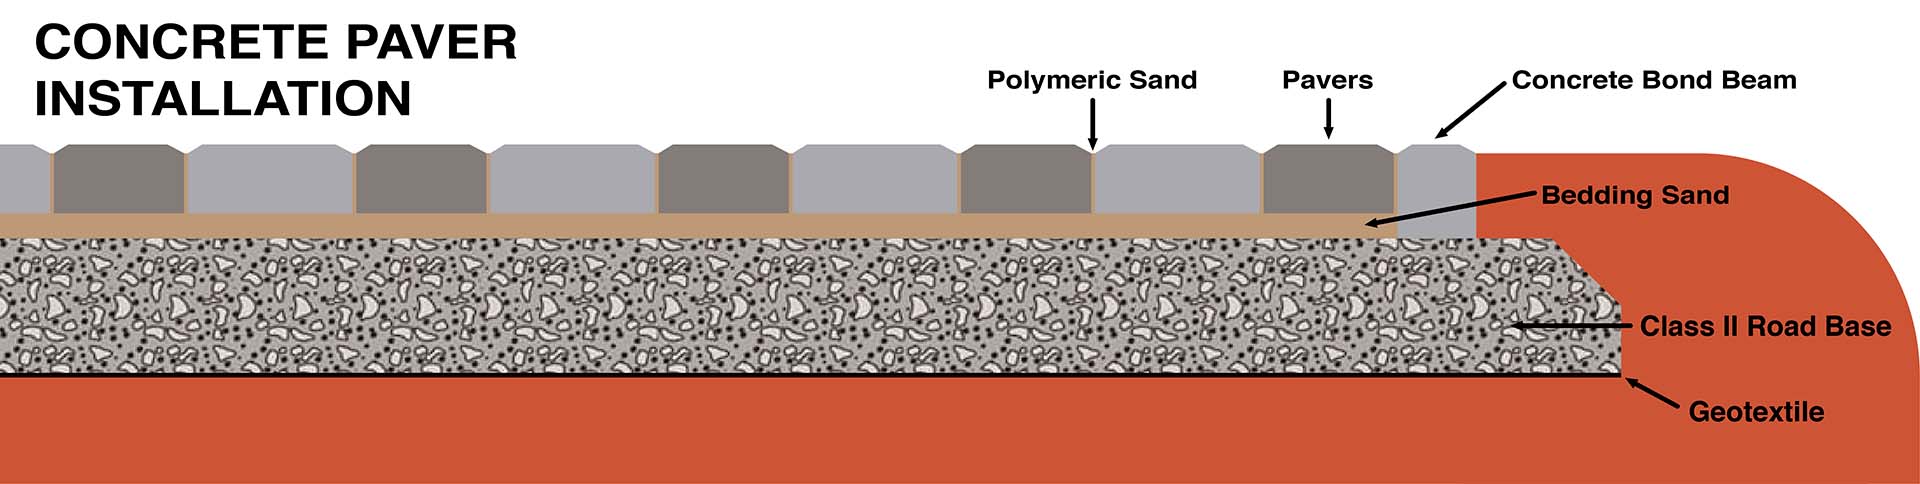
We use Class II base, the same engineered material specified by Caltrans for roadway construction. It’s a blend of crushed rock and fines that compacts tightly and provides superior structural integrity for patios, walkways, and driveways.

Some homeowners ask about “virgin base” — a base material made entirely of crushed virgin rock. While we do offer it and can install it upon request, it’s generally considered an overbuild for most residential hardscapes. Class II base provides the same compaction strength and performance at a far more cost-effective rate.

Along with our geotextile fabric installation, your pavers could not be better built.

Paver installation process. Laying and compacting Class II road base for superior strength and longevity.
Compacting the base in multiple layers to achieve maximum density and stability.
step 4

Compaction in Lifts

The base is compacted in multiple lifts (layers) using professional plate compactors to ensure even density and eliminate air pockets. Each lift is compacted several times — typically 2–3 passes per layer — until the material reaches maximum density and meets compaction standards.

Over-compaction can actually create surface crusting or uneven density, which is why we focus on precision, not repetition. Every layer is checked for stability before the next is added.

After the pavers are installed, we perform a final compaction pass over the entire surface to seat the pavers evenly into the bedding sand and achieve a tight, interlocked finish.

step 5

Bedding Sand

A fine layer of bedding sand is installed and screeded evenly over the base to create a perfectly level surface for paver placement.

Screeding a precise layer of bedding sand to create a perfectly level surface for pavers.
Paver installation process. Laying pavers in the chosen pattern with tight, consistent joints for a seamless finish.
step 6

Paver Installation

Pavers are installed in the desired pattern and design layout, maintaining tight joint spacing and alignment for a professional finish.

step 7

Concrete Bond Beam

We install a reinforced concrete bond beam along the perimeter of every paver system to lock the field in place and prevent lateral movement over time. This solid border creates long-term structural stability — a critical step that ensures your pavers stay perfectly aligned for years to come.

Paver installation process. Pouring a reinforced concrete bond beam along the perimeter for lasting structural support.
Sweeping polymeric sand into joints and compacting the surface to lock everything in place.
step 8

Polymeric Sand & Final Compaction

After installation and final compaction, polymeric joint sand is swept into the paver joints, then compacted again to lock the system together. Once activated, the sand hardens to resist erosion and weed growth while maintaining flexibility.

step 9

Final Cleanup & Walkthrough

We complete each project with a thorough site cleanup and a detailed client walkthrough to ensure full satisfaction — and confidence in the quality beneath every paver.

Finishing with a detailed cleanup and client walkthrough to ensure complete satisfaction.

We don’t just install pavers — we build lasting foundations for the memories you’ll make outdoors.